Showing posts with label Self-Help. Show all posts

Thursday, September 16, 2021

It's been a while...

 Hi everyone,

Today, I received a message from the blog board. It is amazing to me that some of you are still finding it, better yet,  reading it! I am not sure what to say other than "here we go again with another missed opportunity!" 

Blogging is a great way to stay in touch and share additional content I may have missed while filming. It is also another creative way to share my thoughts and progress, however small. Who knows, I may even inspire! 

So for those of you who are still around, kudos and thank you!

It seems that my blog pretty much fell into oblivion, alongside my trunk restoration, the elastic band on the yellow dress, the non functioning electric plug at the back of the kitchen...The list goes on.  I really have no one to blame but myself, in all honesty though, how many different platforms can one manage at a time? 

So let's talk about BALANCE. You all know I have the hardest time settling into a workable routine, finding time to be more business minded and sticking to what I would refer to as my side gig. Blogging, vlogging, reselling...It all takes time. I am not trying to make an excuse for my absence on either this platform or my Etsy shop, I am simply pointing out the obvious. When there are 24 hours in a day and 10 of those hours are spent on making a living, that does not leave much for the rest. I do like my sleep (I hope you do too). But it's simple math: 7 hours of sleep, or bed time rather, added to 10 hours of work, that's 7 hours for the rest. It's obvious (and I won't fool anyone with this one) that those 7 additional hours are not spent cleaning the house! So what do I do with my time and how do I reclaim it?

How does one find the right mindset and the right balance between work, family life, hobby and all the rest. It's not just MY great challenge, I believe it is every working woman's challenge. 

There are a lot of things we would like to do to enhance our day to day life and I am sure you can all agree that at some point in our life we have looked at another woman in absolute awe, wondering "how does she do it all?" Well, maybe the answer is in that 7 hours I seem to waste for no good reason at all other than being wiped out most days or otherwise engaged into running around in circles with no clear direction as to what I need to prioritize next. 

Truth:

I do not have a clear schedule.

I overload my To-Do list which is similar to my To Be Read list: it keeps piling on but really, nothing is ever accomplished here, the same goes with the bazillion other projects floating around my head and let's not get started with the quilting or that walk-in closet I am supposed to build (yes, that was a hint).

I do not prioritize...EVER. It's all super important and therefore nothing gets done. Looking busy though, does not really mean that you are. So on most days, I will look frazzled and all over the place. But truly, not much has been achieved. I think I have mastered the art of puttering around except it's all indulgence at this point. Here is a neat article on the subject. 

I am easily sidetracked, you see. I give you a for instance (true story):

I could get up on any Saturday morning with the intention of filming 3 grossly ambitious videos. Then I remember I need to go to the PO BOX. So I go there. On my way back, I remember I need to stop by the garden center for rose fertilizer, I do that. Before you know it I stop by the First Presbyterian thrift shop before they close. I am not looking for anything in particular but somehow I love the idea of having a large amount of stock I know very well I have zero time to process.  Sure enough I find something I now feel obligated to research. There goes another few hours since one does not simply research an item, surely, you get lost at one point or other into the web of neat stuff available on the internet for procrastinators like me.  Meanwhile there is no plan for lunch. It's already 1:30PM! Fine, we go out for Lunch or maybe we have leftovers. I clean up (somewhat) and realize I have a surplus of beans in the garden. So I go take care of that. On my way there, I find out the roses need pruning. It's now 4 PM and I am losing daylight. No filming today. This warrants a trip to Barnes & Noble where a new To Be Read calls my name. 

Sunday? More of the same. 

Does this sound familiar? 

Do you know what's missing? 

A Schedule and a commitment to go with it. 

The issue here is the repetition of failed expectations and their toll on my overall sense of self. Comes Monday, I feel like an absolute bum. One with zero accomplishment. Rinse. Repeat. 

I am fairly certain I could be way more successful in my endeavors if only I would...Are you ready for this? Commit to a schedule of activities. What a concept!

It sounds like a cliché (that's the French word for Overuse or Been There Done That - Come on now, you've all been there! Right?) Anyway, it may sound like a cliché but unless I start scheduling myself as though a business woman, nothing is ever going to really look business-like, feel business-like or reap business-like benefits. Don't get me wrong, my YouTube and other platforms are doing fairly well...with minimal effort on my part. Yes, I just said that. MINIMAL EFFORT. I film, I edit, I Post. Big deal! Imagine if there was an actual plan! A commitment to creating a serious platform with a clear vision and goal! Mind Blown!

If I earned a Dollar for every business dream I ever had, well, I could happily retire on a farm somewhere in Wyoming, raising chicken and riding my horse into the sunset! That is actually a dream of mine. 

But I am still here, in NJ where Me TIME is being stuck in traffic! You would think I would put that time to good use by listening to audiobook versions of my To Be Read pile! Of course not, that would make way too much sense!

So why am I even sharing all of this and where am I going with it?

It has come to my attention this week that at least 50% of my lack of motivation towards success mentioned above, was the lack of proper equipment. When I was blogging on a fairly consistent basis, while working full time AND filming equally consistently, I also happened to have the proper equipment, namely, a performing computer. Trust me, nothing sucks the motivation out of you more than a laptop that crashes every 40 minutes, writes drawkcab, and other quirks that simply make the task not only a chore, but purely wearisome. 

This week, I purchased a new computer (HP Pavilion All in One) Shameless affiliate link, BTW. And the stuff is going so fast, I am no longer dreading the task. Better yet! I am motivated again! And the proof is in the pudding, I am writing this blog!

So, as one thing often leads to another (see my Saturday story) when it comes to my general approach to life, I feel better equipped now, to renew my commitment to My Great Challenge. 

It's true, and some of you have felt it,  that MGC as a content somewhat became a tad stagnant over the past year. Coming up with new, fresh content is not easy. It's easy when it's not your content, but it's not that easy when you are the one who puts in the hours. But now that I have the proper tools again, a huge weight has been lifted and a renewed interest came with it. 

This is not an announcement that my channel, blog and Etsy shop are going to experience a revival within the next 24 hours. This is not a "come back" or even a promise. It's just me telling you that I am thinking about positive changes that in the long run (let me write that again) in the LONG RUN, are going to be beneficial. 

So let's talk baby steps. I need to restructure, regroup, recommit, not rebrand but at the very least, clarify where I am going moving forward. 

Ideally I would like to keep a schedule of videos 2 to 3 times per week. Mon, Wed, Friday seemed to work in the past. One blog per week on various trivial nonsense I feel like sharing. Could be a week in review. I always liked those plus I feel that the majority of subscribers enjoy this "youtubers are just like us" kind of moments. It's true, after all my DITL (Day in the life) have always been popular (oh look, I just linked you to all my DITL videos!) 

But baby steps first. What can I do, right now, to begin restructuring and reclaim my 7 hours?

I always believed that one has to start somewhere. Is it creating a schedule? Is it waking up earlier? How about a small daily step that could help me feeling a bit more accomplished by the end of the day.

Let's investigate the bedtime routine. 

We have this TV upstairs. We watch it without really watching it to be honest. We cut cable loose a while back so we are essentially just watching whatever is available on Prime. Most nights, one of us falls asleep within the first 30 minutes while the other browses aimlessly before settling on a James Bond rerun. Excitement prevails once you reach our age! So why not put that 30 minutes to good use?

Experiment #1: 30 minutes reading every night. What are the odds that this little baby step would actually lead to something bigger in the LONG RUN. 

This is what I am reading:

How Not to Die


No I am not going Plant Based,  I am only educating myself. And as I am writing this, I realize that I am already past my bed time!

So, good night. I am off to a good start.


Tomorrow I plan on:

Working from home.

Editing and posting a video.

Working on rejuvenating this blog design as it needs a bit of an overall. 

Thank you all for reading my nonsense and cheering me on for yet another attempt at doing better. 

Cheers,

PS: I did sell the Scrapbook supplies. Thank you Carol-Ann


Wednesday, November 5, 2014

Michael Kors Selma - Fake VS. Real Comparison

Hi friends,

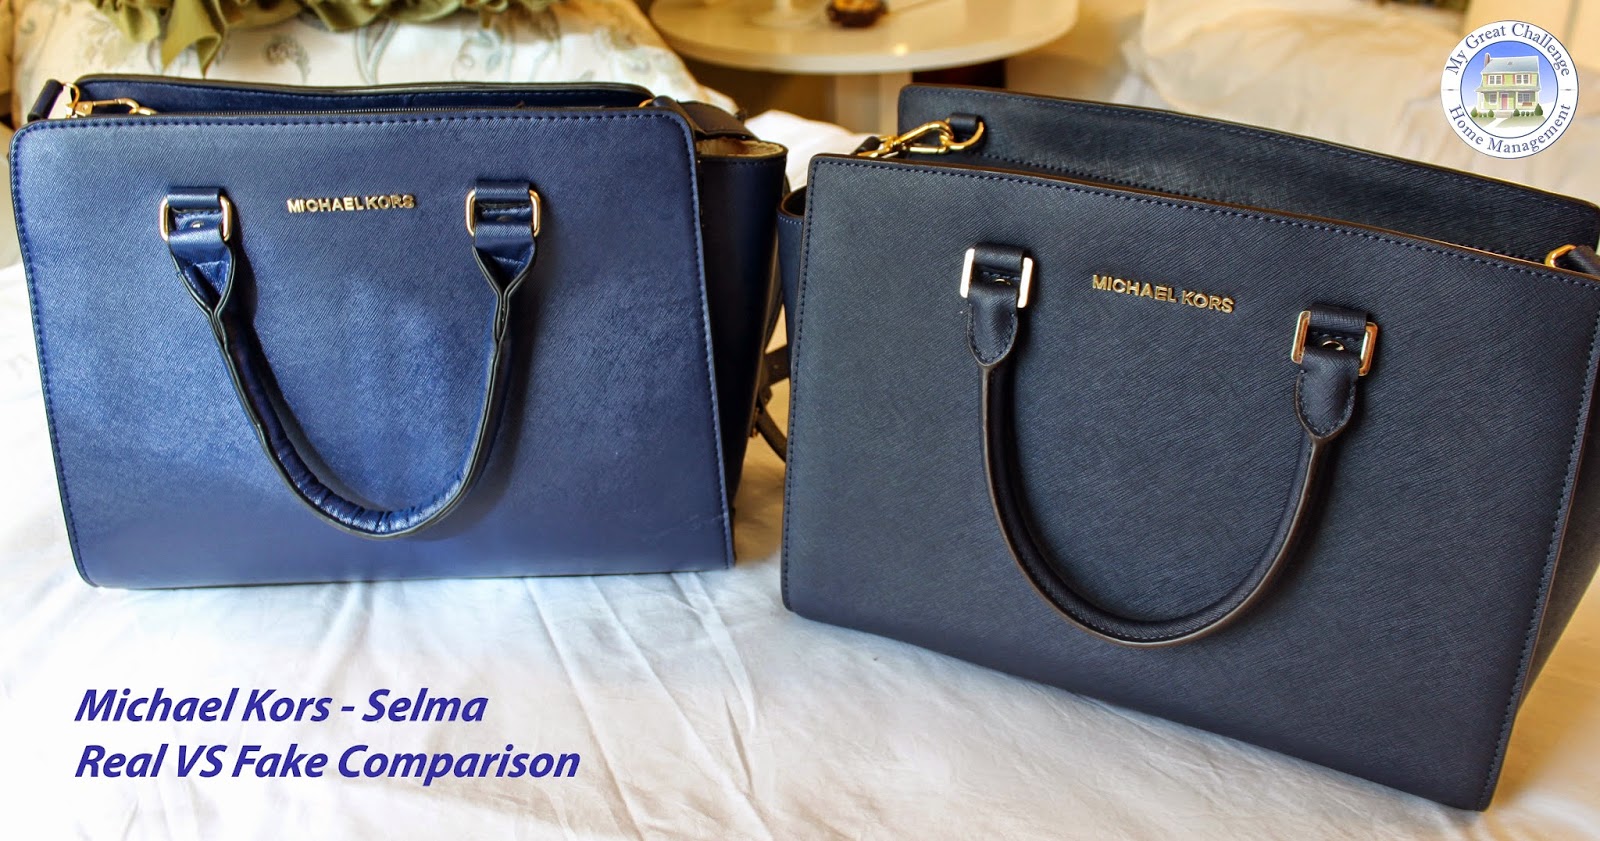
I have something a little bit different today, a comparison between a real high end bag (Michael Kors Selma in Medium - Navy) and the fake version you can find on direct from China sites and select "boutiques", depending on your area.
I am not a proponent of purchasing anything "knock off" . Bootlegging, in general, saps the economy and puts people out of jobs and others into jails. Living in a Metropolitan area, these items can be found about any sidewalk, free floating for all to cheaply grab, whether Newark or New York, though I have to say that there has been a serious crack down in the past 5 years. It is amazing to me the amount of fake bags one can see on any given day and it says a lot about our emotional attachment to labels versus the desire to acquire a quality item you would keep a whole lifetime.

Can you tell the difference? The real one is on the right


So, I purchased this fake one with the intention to stir everyone away from purchasing knock offs in the future. I understand that when given the choice of paying $34 for the make believe version or $298 for the real one, we would all rather pay $34 and be done with it. However, you will get what you pay for!
On an educational note, I am also hoping this will provide you with good information and an appreciation for quality craftsmanship while being able to call out your BFF on fooling you, all this time, into believing she has been trotting along with the real deal!
Before I start reviewing the bag and comparing it with its sometimes obvious, sometimes subtle fake version , here are a few points to remember:

1. Bootlegging is illegal
2. Knock offs are pale comparisons no matter the price you paid for them
3. A quality bag is an investment
4. Support American businesses and our economy, not China's.

************************************************************************************
A tid bit about Michael Kors first:
Michael Kors is an American Brand. The designer of the same name comes from Long Island, NY. He is best known for designing Michele Obama's first lady portrait dress and of course, famous bags such as the one I am featuring today. You can find Michael Kors in most Department Stores and as stand alone stores in large malls. His rose gold watch series for women was also very popular two years ago.
I like the brand for several reasons, one being that it is American. Michael Kors also offers a classic updated look, nothing trashy, everything lady-like. It is simple, understated and for the most part very wearable, in other words, a breath of fresh air! To me, Michael Kors is a cross between Burberry and Brooks Brothers. He adds functionality to where the other two brands  may be a bit stuffy.
Unfortunately, Michael Kors no longer produces bags in America. Since 2012, bag production has moved to China, and I have read that the same company that produces Coach and  Prada bags, also produces MK bags. And THAT, to me, is a shame because even Vera Bradley is outsourcing these days and when considering the state of our economy, we could really use some business here. Sadly, I am pretty sure that the out pour of fake bags and our sucky economy in general are responsible for this outsourcing. On another note, the reverse could be also true: Michael Kors and other brands outsource to China to make a buck or two per bag, the Chinese manufacturers now have the patterns for the bags and resale them to bootleggers who replicate the bags in almost identical ways, thereby perpetuating the vicious cycle of loosing money to the replica market.


Leather and Logo:


Let's start with the texture and logo.  The Selma bag is made of Saffiano Leather. It is a dense, rigid leather that is also textured with a tiny criss-cross/ diagonal pattern.The texture is created via a stamping process (machine stamped). This is calf leather that is also waxed to give it a final treatment and semi gloss. 


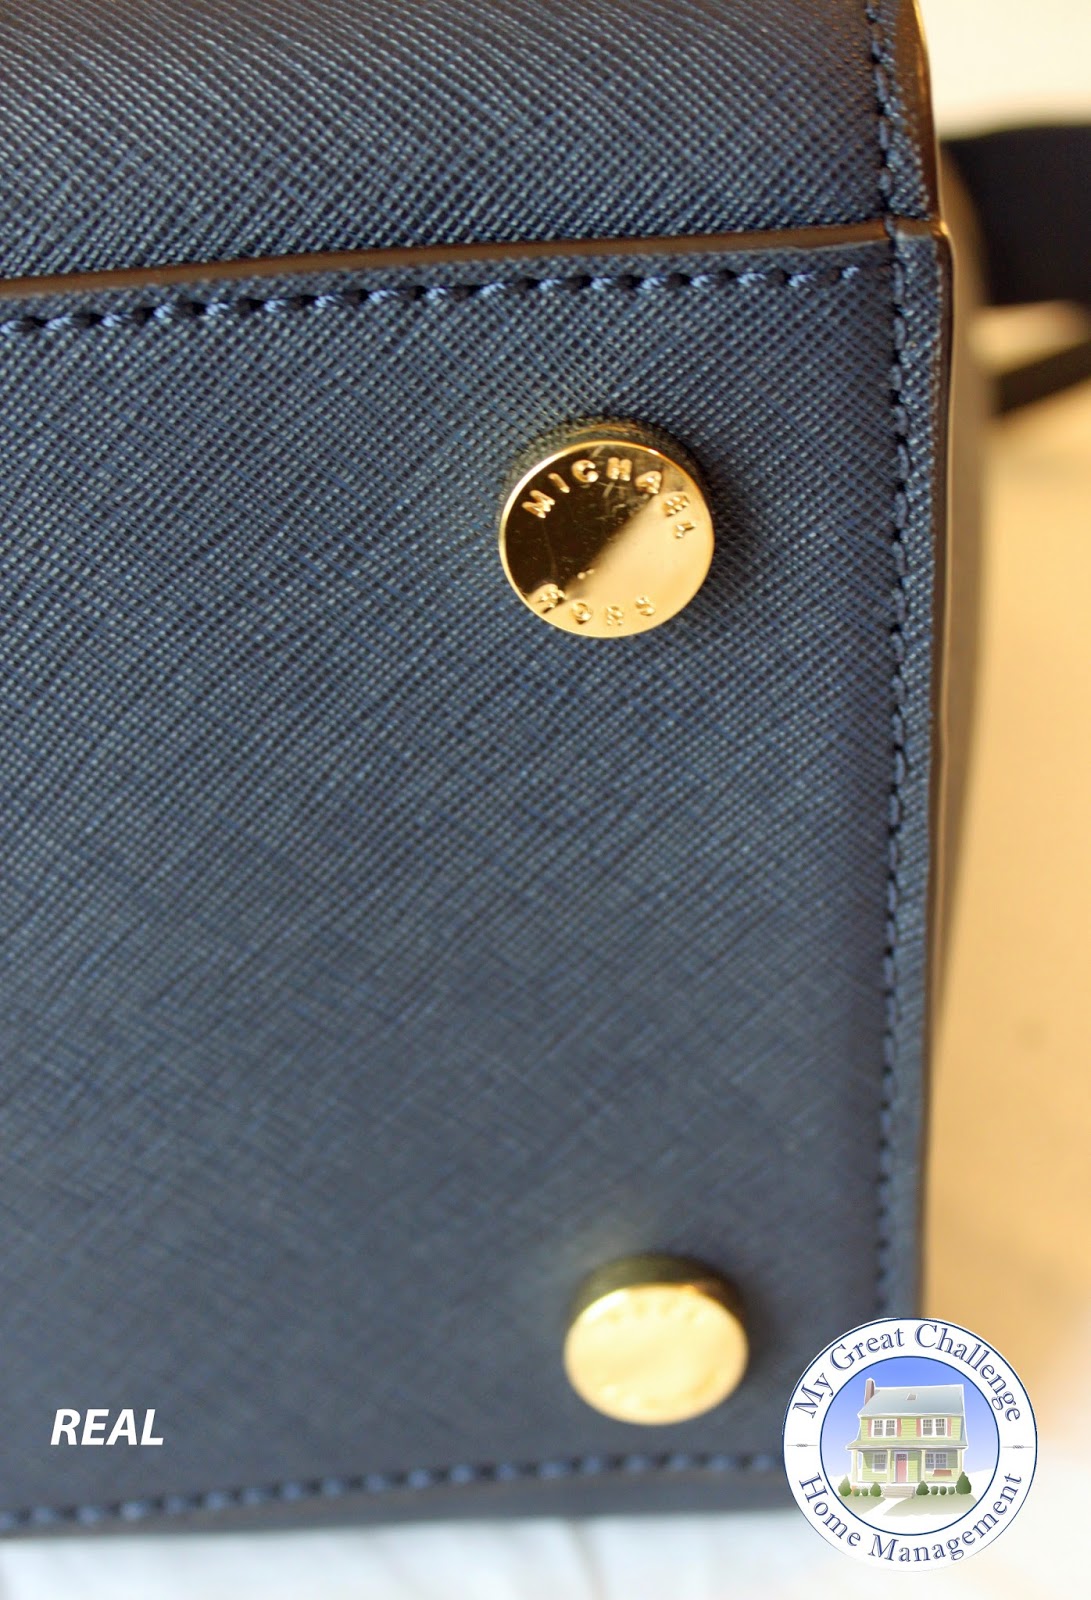
You can tell on the pictures above that the texture itself is well replicated between the real and the fake one However, and you will see that below, the structure of the bags is very different in that the real bag is very rigid while the other one, made of PU Leather (artificial/Synthetic), is soft and floppy. As for the logo itself, the real one is made of flat letters, perfectly aligned and slightly pushed into the leather while the fake ones, though identical in size are not aligned, in fact, and though you really can't see it in this picture, the "I" is flushed into the "M".  From far away, both the texture and the lettering could fool you, however, the colors cannot. The Navy Selma is a deep blue with a hint of purple while the fake version is more Indigo and therefore brighter.

Handles and hardware:

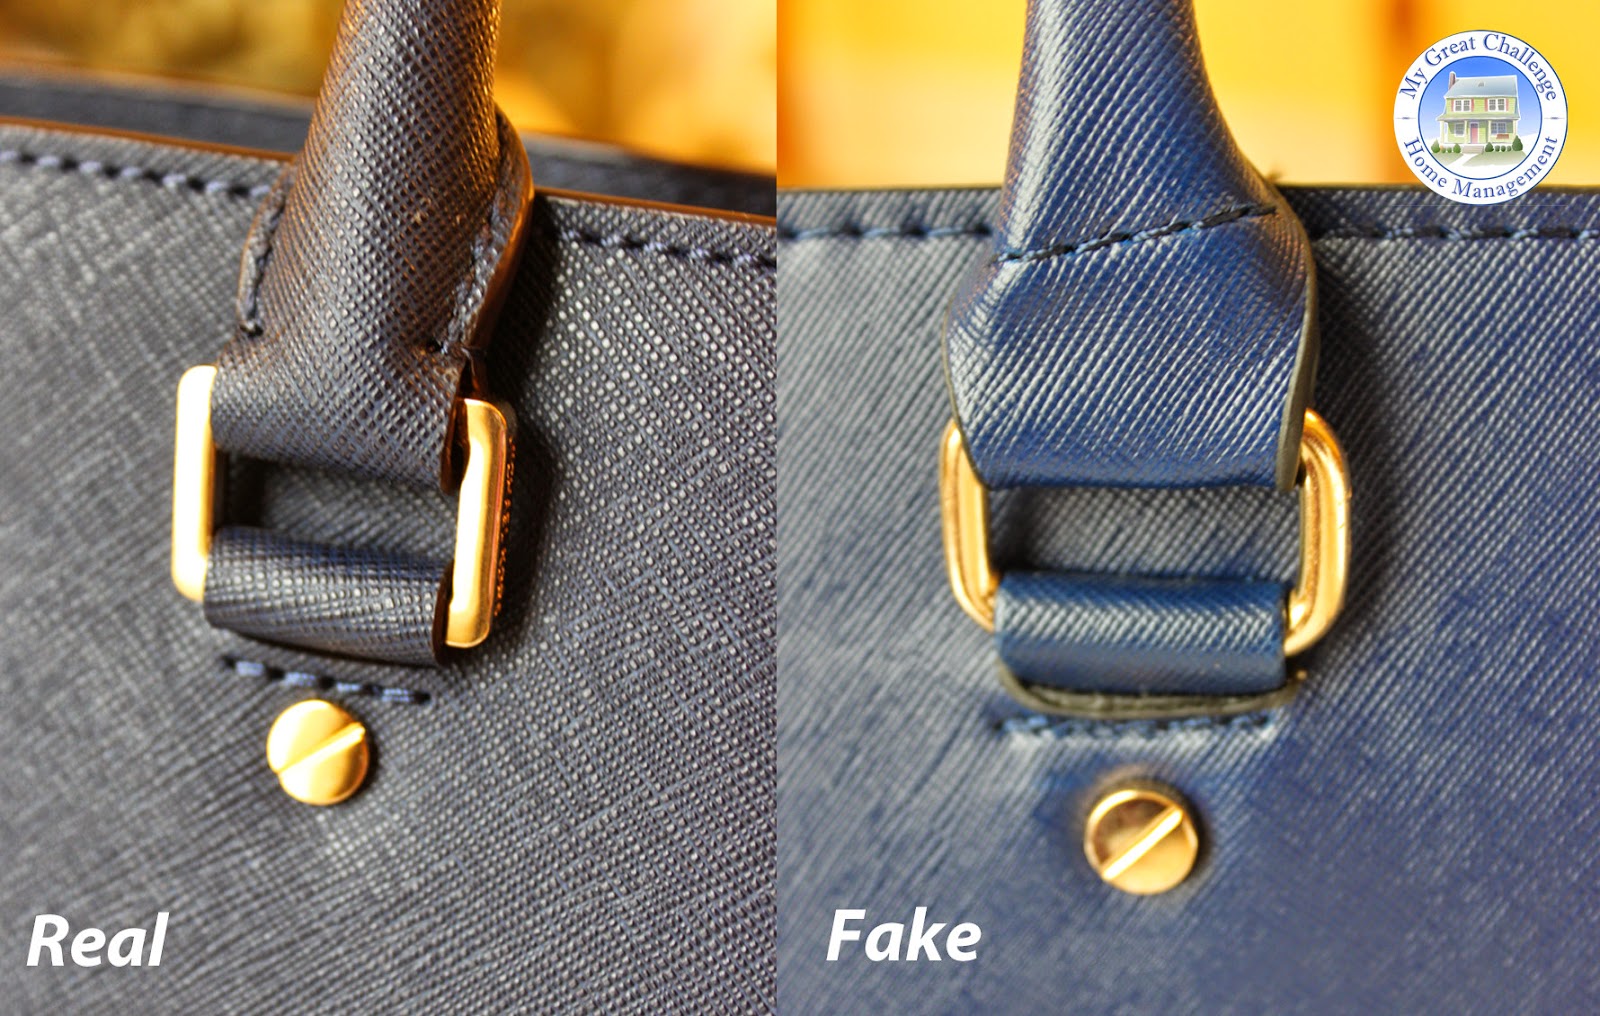
I think this is a closeup (below) that will really allow you to appreciate the craftsmanship of a well made bag versus its knock off version.
Michael Kors ' hardware has a hint of copper tone. Both nails are flat head screw designs however when the biggest difference is in the buckle. The real MK is a rounded square design that is flat along the edges, while the fake version is a simple rounded loop.
The most obvious difference is in the handle base itself, you can see where the stitching on the real one is tight and clean lined while the fake version is a sloppy and not tight at all. They are also not designed the same. This is where good craftsmanship comes into play.


The handle is closed at the base on the real bag while the fake one provides a simple fold. The real handle is stiff and tight while the fake is filled with a soft foam tube that leaves the top part pleated and overall provides a flimsy feel when the purse is carried. 


Zipper and Closure:

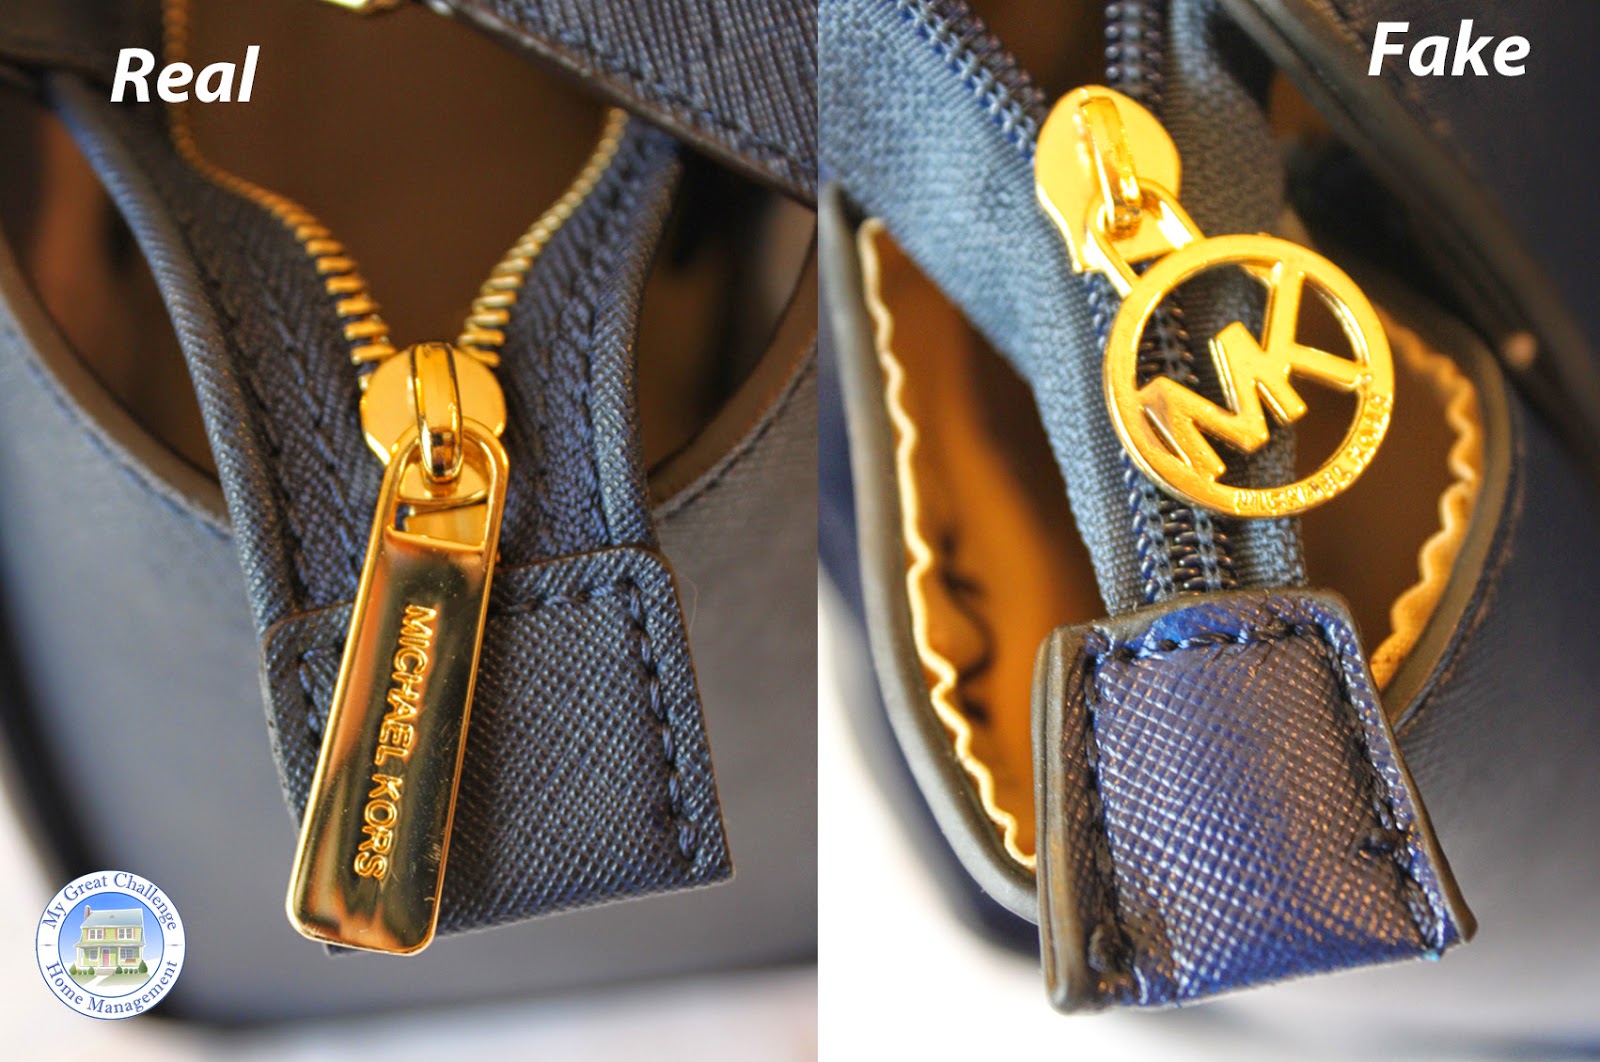
 A good bag is often judged by the quality of its zipper. The real MK is a brass finish while the fake is dark blue. The real one is a bit stiff when opened and closed, it needs to be worked in while the other is soft and gaping when opened. The most obvious difference is in the zipper pull. Real MK bags have a Michael Kors tag like pull while the fake will provide you with a MK circle logo that is made of metallic coated plastic sure to break at one point or the other.
More craftsmanship can be seen in the way Michael Kors designed the end tab of the zipper, it is clean and squared away while the other is sloppy with obvious stitching, not to mention that the zipper in the real one is edged with leather and goes flat all the way till the end, where it is covered by leather. In the fake one, the zipper is not edged and simply rolled into the final tab, giving it a sloppy look. The real zipper actually ends before the tab, while the fake one just keeps going and only the tab stitching will stop the zipper.


Sides:                                      

This is where you can really appreciate the difference between the two bags. The real Michael Kors is made of one piece of leather that goes from front to back while the fake one is made of two pieces of PU leather that are sewn under the bottom.
Stitching on the real one is tight and leaves very little of a lip along the side while the fake one, though more malleable in terms of the ease of sewing, is quickly stitched together, leaving folds and wider lip. 
Because Saffiano leather is rigid, it stands stiffer and will hold its shape.  The fake leather cannot hold in place and the sides tend to collapse.


Inside pockets and lining:


Michael Kors uses a soft and pale fabric for its lining. While it is also a MK Logo pattern, all the letters are facing in the same direction regardless of placement inside the bag. The fake one is screaming MK all over, in all different directions whether by placement or pattern itself. The lettering is also darker and the fabric, though both are synthetic material, is stiffer in the fake one and makes noise when ruffled. The lining on the fake one is also stitched in the middle at the bottom of the bag while the real one is made of one piece of fabric.
The real bag offers a full size zipper enclosed in squared leather tab with a leather pull. This side of the bag offers a rectangular pocket (for cellphone) and a flat pocket for other items. The flat pocket offers a leather tab embossed Michael Michael Kors.  Both pockets are edged with leather with a contrasting stitch on each end and middle point, shaped in a triangle.
The fake bag offers a similar configuration, however, the zippered pocket is much smaller and the PU Leather frame is rounded.  The Michael Michael Kors tab is present, but placed on the other pocket.
On a side note, the real bag also provides a leather lanyard with a lobster claps for keys. The fake one does not have one.

On the other side of the bag, the real one offers two flat pockets with the contrasting triangular stitching while the fake one offers the exact same configuration than its opposite side (minus the zipper) in that it has one flat pocket and one cell phone pocket.

Shoulder Strap:


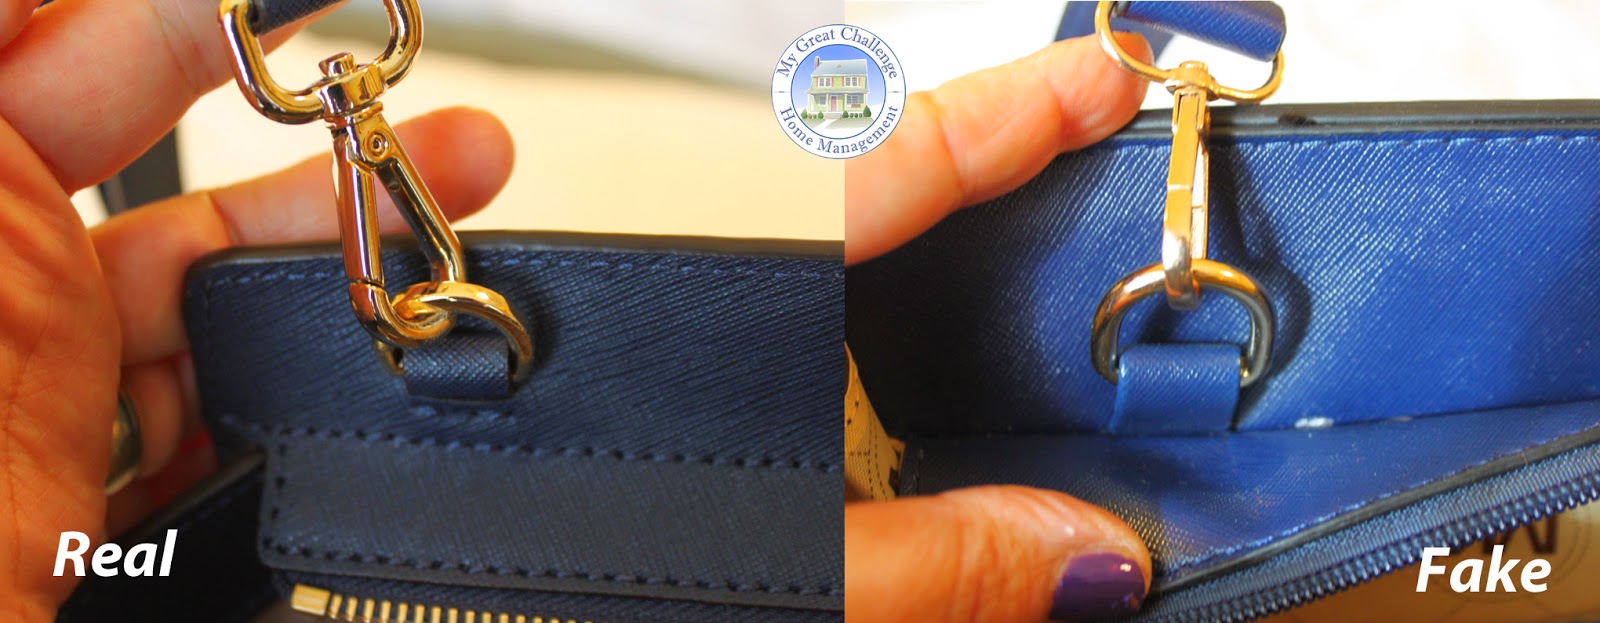
The real bag on the right has a solid clasp with a holding band that is stitched into the side while the fake version has a band stitched into the seam and sure to break. The hardware on the fake one also feels very weak.

Bottom Nails:

I did not take a picture of the fake one (oops). Bottom line is that the feet on the real MK bag are flat and engraved with Michael Kors all around while the fake ones are rounded nails with no markings.


The bottom line is that the Selma by Michael Kors is a very well made bag that will, if cared for, last forever while the fake one will provide you with one season, at best, of shopping around with play and pretend.

My advice to you is to save the money and purchase a real bag - if owning a Michael Kors bag  is that important to you then just wait and save. Trust me, you will not regret it. I am not happy that they are manufactured in China but it is obvious to me that the quality control team is getting its money's worth and I am going to assume that all Michael Kors bags are made with the same craftsmanship and attention to details. 
I am not a bag maker nor a seamstress, so I am sure that I have placed a few misnamed terms here and there in this review, I think the pictures speak for themselves though,  in that your hard earned moneys will be better invested in a well made purse rather than a fling that will last you only a few months. 

If you were looking for a replica Michael Kors, I am hoping this review made you "snap out of it" and that you have made the decision to save up and buy the real one instead.

Here is the coordinating video if you want to see the two bags side by side in a "live" way.


Thank you so much for reading my blog and watching my YouTube videos! Share the love!

Sophia, NJ


Connect with me:


Want to send me a product for review? Have a product request?
Mailing address:

My Great Challenge
PO Box 402
519 POMPTON AVE
CEDAR GROVE, NJ 07009-9998


 *********************************Advertisers/Affiliates ******************************


Find your own Selma at Nordstrom


Friday, May 16, 2014

DIY Vanity + Makeup Storage

Hi friends,

This is a project I have been putting off for so long, but no more!

My husband and I have not done much with the Master Bath in our attic since we bought the house and it is just about as functional as functional can be. Tub/Shower, toilet, vanity with one sink, mirrored cabinet. That's it!


This is our bathroom after I had painted it prior to moving into our home.

It's a no thrill bathroom - but it does like space and storage for all my junk (ahem - makeup)


I had this dresser right under the window, which I use for my intimate stuff (undies etc.), socks and pajamas. I don't care much for the standing cabinet you can see in the back, the glass part of it is cool, but the drawers are too deep and very narrow making them unpractical for makeup and other small items. 

So, after 3 years in our home, my makeup collection and other stuff grew and the bathroom exploded with bins on top of bins, trays full of stuff, drawers that could not longer be shut etc. So, I decided it was time to take matters in my own hands and build a vanity that would be an extension of the sink, with enough storage underneath to stash all my stuff - in a more organized and functional way.

(These are not the best pictures in the world, they were all taken with my cell phone - I hope you do not mind too much - I am simply trying to showcase the process here).

My first step was to remove the dresser - it was relocated to the other side of the room, by the door.
I also disassembled the tall cabinet and only kept the glass top for storage. This would make a great storage unit if fixed directly onto the wall.


I came up with a design that would fit the overall look of the bathroom and took off to The Home Depot to have some plywood cut to size.


I started with a simple design, two cubes with shelves on either side, feet and a single shelf on top, a lip all around, nothing fancy.

Here are my measurements:

Top: 53 3/4 x 21
Sides (4): 21 x 20
Shelves: (4): 21 x 15
Bottoms (2): 21 x 16.5
Lips (all around): 53 3/4 x 2.5 and two 21 x 2.5
Legs: I used deck spindles cut to size (8.5) but you can also use 2.5 in dowels cut to size.

The idea here is to simply assemble all the pieces using deck screws and wood glue. I started with the cubes.


Once the "U" shape was put together with three deck screws on either sides, all I had to do was insert the shelves and screw them directly into the sides. I did use wood glue on all sides prior to using the more permanent screws.


This is what it looked like once the two cubes where completed. I temporarily placed the top so that I could measure the needed space in between as well as the amount of overhang (in the front) I wanted. The overhang makes the vanity a bit more stylish and much less like a homemade design. My overhang is only 3/4 of an inch.


For the legs, I used leftover spindles from our front porch project a few summers back. These spindles are perfect since one will produce two feet, so all together, I needed four spindles (8 feet).


This is a great way to recycle stuff you have laying around in your garage. All I had to do was measure the height needed (8.5) so that the top of my vanity would align with my other counter top (with sink). I needed to cut the ball (in the middle) out and measure on up to 8.5 inches.


Here, they are, all 8 of the feet for my vanity.


Now, attaching the feet to the bottom of my cubes was a bit tricky and I ended up drilling a hole in the bottom and the foot, then used carriage bolts straight into the foot for a solid hold (I explain this process in detail in the video below).


The advantage of using carriage bolts drilled directly from the inside of the cube into the feet is of course stability and if need be, they can be tightened. Something that would not have been possible, had I just toe nailed the feet directly into the bottom panels.


On to the top!


Adding the lips all around was not a huge task either, however, instead of nailing them, I pre- drilled holes and screwed the lips directly into the top panel from the bottom. If you are planning on replicating this DIY project or a variation of it, remember to place the lips prior to fixing the top onto the cubes, otherwise you will not be able to screw the lips directly from the bottom of the flat top. I am hoping I am making some kind of sense here. I simply used wood glue and finishing nails to affix the top onto the cubes.


I wanted to have more use of the top and decided to add a shelf on either side, with a gap/ space in the middle for my mirror. You could also run a shelf across the entire top if you want to, it is just a matter of using finishing nails directly into the lips. You would need smaller inserts to support the middle part of the shelf though.

In my DIY project, I have a shelf on either side.


Because this is plywood, it is important to spend a lot of time sanding all surfaces and buff them to a smooth finish before painting.


I did use caulk (the paintable variety) all around to fill in hairline gaps and little defects in the plywood.

For paint, I chose a Glidden interior latex in bright white/semi gloss. The hardest part was to paint all the corners first (twice) before applying the top coats on flat surfaces.


And here is the finished vanity:


Next week, I will take you on a tour of all my organization and makeup storage ideas since the whole point of the vanity, was to store my makeup and other pampering goodies.

Here are two videos I made of the full project - I explain everything in much more details.

Part One:


Part Two:


I really hope I inspired you with this project - it really was not too hard, it is just a matter of being organized and taking the time to go through the process, no skipping steps on that one.

What do you think? Is that something you could build? I am interested in finding out what modifications (if any) you would make if this were a vanity for your own use.

Thank you for reading and sharing my blog.

Connect with me on:

Sophia, NJ.

***********************************************

Have you tried it yet? Teavana iss my favorite brand of tea! You can read my review here.

Introducing Teavana Oprah Chai Tea, our most spirit-warming chai tea ever! Shop now and get FREE shipping on orders of $50 or more! (Valid while supplies last)


*This blog contains affiliate advertising. I receive a commission on items purchased through my links. I am not solicited to review products and all opinions are my own. I also purchase items with my own funds unless otherwise noted.

Related Posts Plugin for WordPress, Blogger...
Pin It button on image hover