About Me

Sunday, September 29, 2013

October 2013 - Franklin Covey and Filofax Calendar Inserts

Hi friends,

It is that time of the month when I upload my inserts for the Franklin Covey - Compact and Filofax - Personal.
This time around, I did something a little bit different (I was also stressed for time) and used free images from the web in vibrant fall colors. Let me know whether you like these as much as the other ones or would prefer something completely different.
I received a few email requests for templates without labels or date. For those of you who would rather insert your own labels, etc., I will email (personally) the Publisher files. That way it is easier all around, not that I don't want to make special templates, I just do not have the time to make them on demand...so many different needs!

Here they are, and as always, these are available in both sizes: FC Compact and FF Personal (see links below).

These pictures show you how the inserts will look like straight out of your printer. You can see that I have included crop marks - the final ones will not look like these once cropped . All you have to do is follow the crop marks using either scissors or a guillotine.


For the week of Halloween, I inserted a free art background I found on the web...Thought it was spooky enough!


Here is a video to show you what they look like once they are trimmed:


I hope you like them!

Here are the link:

Franklin Covey - Compact Size

FC - Week 1
FC - Week 2
FC - Week 3
FC - Week 4
FC - Week 5

Filofax - Personal Size

FF - Week 1
FF - Week 2
FF - Week 3
FF - Week 4
FF - Week 5


Thank you for sharing MGC with friends and family!

You can find me on FACEBOOK and YOUTUBE.


Sophia, NJ.


* This blog  contains affiliate advertising. I am not affiliated with Filofax or Franklin Covey, I make these inserts for my own personal use and share themwith you free of charge -  all opinions are my own.

Saturday, September 28, 2013

Homemade Meatballs


Hi friends,

I don't know about you, but I am sick and tired of trying to figure out what's for dinner! Every night it's the same circus, I come back from work, open the fridge and scramble to figure out a complete nutritious meal for the family. Why? Because I shop for our regular items but don't really have  a plan in mind.
Well, no more!

I have decided to dive into menu planning and while I have not officially started, I did a little bit of an experiment the other day and prepared a batch of meatballs to eat for one dinner, as well as a batch to freeze for later on that week!


I served my meatballs on a plate of Rigatoni pasta ... and it was delicious!

This video shows you how I prepared and froze the meatballs for two dinners and two lunches:


Thanks for watching!

You can find me on FACEBOOK and YOUTUBE.

Sophia, NJ.


 *This blog contains affiliate advertising. I receive a small compensation for items purchased through affiliate links. I am not solicited to provide reviews.

Saturday, September 21, 2013

Organizing the kitchen

Hi Friends,

Well, I just about had it with the clutter and general mess in my kitchen! For starter, I did not design it, and very obviously whoever designed it was not a woman either. There is so much bending down and reaching up, my kitchen won't qualify as "ideal" for any cook! That being said, the abysmal lack of organization is not helping one bit and if anything, it is making matters worse!


After watching a video series from Libby Withnall on YouTube, I decided it was time I seriously reconsider the positioning of every item in my kitchen. I was truly inspired by her videos, granted she has a fabulous kitchen!

Libby's videos on YouTube:


Is this the most amazing kitchen? She also has such a beautiful assortment of bowls and cute plates....Libby! I want your kitchen!


So, I was completely inspired to take a look at what was inside my cabinets  and since I still had two more bags of junk to fill for my 30 bags in 30 days challenge, I just rolled up my sleeves and worked (on my birthday, no less) for a good 4 hours.

On day one, I was able to complete 5 cabinets and a set of drawers. On day two, I tackled the under sink area and four more cabinets.

My strategy was simple:

  1. Minimize the amount of bending down and reaching up by positioning my most used items at arms length level. With that in mind, I also wanted to minimize the amount of walking back and forth to fetch anything I would need.
  2. Put the least used items (such as small appliances) into one centralized location so that they would not clutter prime "real estate" space in other, more functional cabinets.
  3. Get rid of all non used, broken, damaged, hideous stuff I either do not use or not care for any longer.
  4. Group things by categories and near areas where they are needed. For instance, we use the large counter to serve meals and pack leftovers for our work lunches, so all storage containers and serving dishes should be in that area, not on the other side of the kitchen.
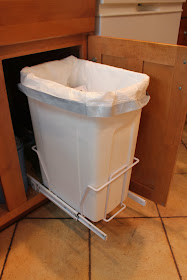
  5. Get rid of the large garbage can which takes too much floor space and block access to one cabinet, and replace it with a smaller, under the sink, pull-out bin!

On the far end of the kitchen, near the dining room door, I emptied out an entire cabinet full of junk and filled it with all my small appliances. Everything that has a plug in this cabinet.


It is far from the most used area in the kitchen (large counter) and therefore does not clutter valuable space.  I have all the appliances we use the most on the front of each shelf, with the ones we use less at the bottom of the cabinet and those we reach out for most often on the top level. Behind each level are all the appliances we use the least. Accessories are also organized in bins and easily accessible.


This cabinet (below) is directly under our large counter, where we serve meals and pack leftovers. It made sense to have all the serving dishes and the leftover storage containers in this cabinet.


This is where I keep all my Corning ware as well as all the Pyrex dishes we use for leftovers. In addition, since most cooking prep is done in this area, mixing bowls and scale are located here as well (before, they were in the far end cabinet where I now keep my small appliances. No more walking back and forth!
 
The cabinet directly above this counter area used to contain all our vitamins, first aid kit and aprons. It just was not a space maximized for functionality so I relocated the boxes of vitamins and the first aid kit to above the fridge. Instead, I now use this area to store all our lunch containers.


And it makes a lot of sense since this the area where we pack leftovers, instead of reaching all the way down to a drawer were I kept my Tupperware and plastic containers, I now have containers right there, no bending down! I also got rid of every single plastic container and top we had around the kitchen and replaced them all with healthier and sturdier glass containers. Right above those containers, I keep all the travel coffee mugs, they are easy to reach for me in the morning.
 
Next to this particular cabinet, we had another one where I was keeping our cleaning rags and breakfast items (coffee etc.) But I found that reaching up for coffee every day was just not practical. I also wanted to clear out some space in the drawers below that counter and decided to use the inside panel of the cabinet to organize all the measuring spoons and cups.


Since we reach for coffee everyday, it made sense to store it where it would be easily reached for. We also do the baking and cooking prep in this area, so having the measuring spoons readily available is also a plus, not to mention that we no longer have to separate them  since they are already organized individually.


I used my label maker to identify each spoon/cup with its respective hook!


All towels and rags were relocated to a drawer below and near the sink.
 
Since I had moved a lot of appliances out of cabinets near the stove, I had new space for baking dishes. In the past, my baking pans were in the far end cabinet, away from the stove and the counter.


Now all my baking dishes and pans are near the stove, including the cookie sheets.
 
Don't miss my video:
 
Kitchen Organization - Part I: in which you get to see all the before and after as well as a  haul from Macy's , Target and Home Goods.


Then on day two: I focused on replacing the old garbage can with an under the sink rolling type bin.


I had this large garbage can I had purchased at Home Goods which was on the other side of the counter (out of sight) but required walking from one side of the kitchen the other in order to reach it. Further, it was also blocking access to a very large and very deep cabinet under the counter. 
So, I replaced it with this under the sink rolling bin I found at Home Depot under $50. It took under 10 minutes to install it!


With my new regained space, I decided to remove the door from the cabinet and use the shelves for all our cooking books. That way, they are visible and reminders that there is more to dinner than Spaghetti Meatballs!


Finally! A space for humans and I am falling in love with my kitchen again!
 
On to the glassware and dinnerware! This cabinet had a combination of glassware and mugs. The cabinet next to it contained all my plates and bowls but  had some glassware too. So I decided to use the left cabinet as a glassware storage and the right cabinet solely for plates and bowls. Below is the glassware cabinet (before and after).


I went through all my glasses and tossed a whole bunch, those I decided to keep were washed and buffed to a shine before returning to the cabinet!


I also purchased a rack for the bottom shelf in order to maximum space and double stack those mugs I had decided to keep.


Inside the right cabinet (below) I now keep all the plates, bowls and platters, including the Winter Greetings plates we use during the holidays.


In order to keep things off the counter tops, I purchased two paper towel holders and placed one on the wall near the sink:


And another one near the stove, to quickly pick up spills.


My counter has never looked so cleaned and decluttered....except maybe, on the day before we moved into the house!


And why bother keeping the pot lids in a cabinet when they fit perfectly fine behind the freestanding stove?


In all, this is the best thing I have done in the house in months of running around trying to figure out ways to simplify my life. My kitchen is efficient and better yet, enjoyable. There is not a thing that is in the wrong place, everything has been evaluated and positioned exactly where it makes sense to have it...I am happy, Scott is happy...what else could I ask for? Now, if only I could learn to cook!
 
Watch Day II of my Kitchen Organization Series on YouTube:


Many thanks to Libby Withnall for inspiring me.
 
Thank you for sharing my blog with friends and family. I love to know how my readers are doing and what they find interesting on my blog, thanks for leaving a comment.
 
Sophia, NJ
 
*This site contains affiliate advertising. I am not affiliated with any brand mentioned in this post "kitchen organization".

Sunday, September 8, 2013

Yves Rocher Product Giveaway and new product Reviews

Hi friends,

I am back with a giveaway (see bottom of the post), this one is for Yves Rocher Products.

Yves Rocher is currently running a sale with a lot of products 50% off and as always, they are very generous with the gifts with purchase!!


Here is the video review:


Products mentioned in the video:

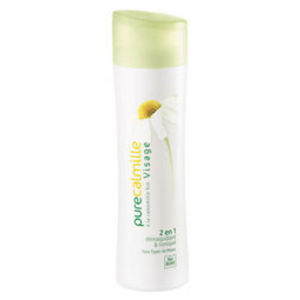
2-in-1 Cleanser + Toner


2-in-1 Cleanser + Toner

I purchased this cleanser to alternate with my YR Micellar Water Cleanser and fell in love with it. If you like wipe off cleansers similar to cold creams, this one is definitely for you. It is very gentle and very fluid. I apply it directly to my dry face and smooth it on all over, including my eyes. Though you can wipe it off with tissues, I prefer to use a slightly damp face cloth. It leaves my skin clean of any makeup residue, including eye makeup, without feeling dry. There have been times when I did not even feel the need to add a moisturizer afterwards. Unlike traditional cold creams, this is more like a milk/lotion that will not leave a greasy residue on your face. I have been using it for over 2 weeks now and have experienced no breakouts or enlarge pores. Overall, my skin looks more even as well. This is great as a night time routine!


"Enriched with flower water! The mildness of a milk and the freshness of a lotion combined in a single gesture. An ultra-practical beauty gesture for quick, easy daily cleansing: perfect for all women on the lookout for simplicity and natural products. The Plus : its melting gel texture leaves a non-sticky, very soft finish."

$11.50  $6.50  (currently 43% off)

Click link to purchase:
2-in-1 Cleanser + Toner


1-Minute Nourishing-Repairing Mask


1-Minute Nourishing-Repairing Mask

You may know by now that my hair is unbelievably difficult to manage. It is super curly, but not kinky enough to maintain its curls. I am constantly on the lookout for a product that will nourish my hair and leave it soft and manageable without using a blow dryer (I would say that 90% of the time, I let my hair air dry).
I have tried so many products I would need a blog post dedicated solely to listing them all. One big rave lately has been the Macademia Hair Mask, but really who can afford that $33 per jar!!
I saw this one on the YR site and figured I really did not have much to lose.
Overall, this is a good conditioner, you would apply it after shampooing and leave it on for 5 minutes. I usually start my shower by washing hair and applying conditioner, combing it through, then moving on to body washing. This is a nice product, I find that it does not weigh down my hair and leaves my hair silky, and helps my curls stay in shape. If you have wavy or straight hair, this would be an awesome mask for you. I like it.
One drawback for me is the size of the container itself, there is not a huge amount of product, I would say that there are about 6-8 applications there. It is one of YR's Best Sellers as well as it received great reviews.

"Made with Oat milk, this rich, buttery-textured treatment infuses your hair with elements essential to its nutrition and repair! It restructures your hair without weighing it down, leaving it supple and soft, with restored body and vitality.The Plus: It is enriched with Shea Butter for its reparative power!- May also be used as a conditioner- Tested under dermatological supervision- Silicone & paraben free formula"

$11.00

Click the link to purchase:
1-Minute Nourishing-Repairing Mask


Detangling Styling Water


Detangling Styling Water

I have been on the market for a leave-in hair conditioner/styling water. I have been satisfied with some of the products I have found thus far, however, as I am showing signs of hair loss and my discovering that I am allergic to Nickel (a metal often contained in hair products) I want to veer more towards natural hair products. I found this on the YR site and decided to give it a try.
First, this is a very inexpensive product ($9) and the bottle itself is huge (10 fl.oz). The sprayer is of good quality as it sprays a fine mist rather than a blob of product onto your hair. It smells wonderful too, obviously herbal with Linden extracts. I find that it finishes my hair nicely in the morning, I spray it directly only towel dried hair, clip my bangs and I am out the door. I usually let my hair dry in the car on my way to work and thus far, my hair has continued to look styled and put together, without the fuss of having to style it. I am very happy with this product and will repurchase it! Another YR Best Seller!

"An extra-mild styling water with a captivating floral scent that transforms hair to the touch: thicker, more supple, hair is well-groomed and easy-to-style.The Plus: its softening formulaCare for all hair types.Tested under dermatological supervision.Silicone & paraben free formula"

$9.00

Click the link to purchase:

Detangling Styling Water


Pure Light - Light & Luminous Foundation


Pure Light - Light & Luminous Foundation

For a long time, I did not think that any product would beat my MAC Foundation. I saw this product on sale and decided to give it a try since it looked more like a sheer foundation which is what I need in the summer.
My opinion is that this product is absolutely amazing! I am completely head over heels with it and plan on purchasing a few more to stock up. This is a very fluid foundation that applies evenly (no streak along the neckline). I find that it blends immediately and does a great job evening out my skin. I barely use concealers now as a result. It also has amazing staying power without suffocating my skin, clogging my pores or looking running off my face. I always use a brush to apply foundation, but quite frankly this one does a great job when applied directly onto the skin with fingers alone! I use the Rose light(I have a fair complexion and tend to like ivory to beige products on my skin.

"For the very first time, Yves Rocher Botanical Beauty Research has introduced radiance boosting Rice extract in a new foundation. Each time you use it, your skin regains vitality and radiance, becoming softer and more luminous. Its ultra-fresh light moisturizing texture is easy to apply uniformly. It provides maximum comfort for a sensation of no makeup and impeccable natural coverage. The skin's texture is visibly smoothed and the complexion is uniform. This fluid foundation Pure Light - Light & Luminous Foundation is available in 12 shades adapted to fair, dark and very dark skin tones. The skin breathes, the complexion is perfect, radiant and luminous. The Plus: Its practical elongated pump dispenser for a better grip!"

$22 $12.10 (45% off)

Click the link to purchase and choose your shade:

Pure Light - Light & Luminous Foundation

And now for the giveaway!

So, as always, Yves Rocher sent me oodles of samples and full size products with my last purchase, so I decided to giveaway some of the items they sent me:

In this giveaway, you will get a chance to win two full size products and one bag:

Here are the products:

This is a Cleansing Water and Makeup Remover from the Hydra Vegetal Collection (Normal to Combination Skin) - These are Full Size Products ($13 each), I did not use them at all, Brand New:


The Hydrating Cleansing Milk:
 
- Eliminates in-depth all traces of makeup and impurities
- Perfectly smoothes skin
- Leaves skin soft, radiant, hydrated

For Normal to Combination Skin
Formula tested under dermatological supervision

Botanical-based ingredients: maple sap.
 
 
The Hydrating Toner:

- Perfects cleansing by removing the last impurities
- Revives skin's radiance
- Tones and moisturizes skin

For Normal to Combination Skin
Formula tested under dermatological supervision

Botanical-based ingredients: maple sap extract, organic witch hazel water.

 
Yves Rocher also sent me a bag (which you can see folded in the background)


And because I have too many bags, pouches etc., I am also giving away the bag!


It is a canvas type bag with drawstrings.


Giveaway rules:

  • You must be 18 years old or older (otherwise, parental approval is needed)
  • You must be a subscriber to my YouTube Channel and Like my Facebook Page.
  • If you wish to, you can also leave a comment for one additional entry into the giveaway.
  • This giveaway is open internationally since I have a lot of subscribers and fans from around the world and it would not be fair to count them out!
  • Giveaway ends on Wednesday September 18, 2013, the winner will be notified by eMail and will have one week to respond before I draw another winner!
 
 
Please follow the Rafflecopter instructions below:


a Rafflecopter giveaway

Good luck!
Thank you for sharing this giveaway with friends and family!

You can find me on FACEBOOK and YOUTUBE.


Sophia, NJ.


* This blog and blog post contain affiliate advertising. I am affiliated with Yves Rocher which means that I will receive a small compensation when you purchase from any of the links above. I am not solicited by Yves Rocher to provide reviews and/or Giveaways. All opinions are my own.